Before doing anything else, check the tire pressures and inflate as needed. Do this for the spare as well.
There are several patterns by which you can rotate the tires. Two typical ones are the "X" pattern and front-to-rear. In the X pattern the left front tire is switched with the right rear, and the right front is switched with the left rear. In front-to-rear, each front tire is switched with the rear tire on the same side of the car.
Park the car on a flat surface (inside a garage is best). Chock any one tire. Lift the opposite diagonal corner of the car and remove the wheel.


Be sure to take the opportunity to inspect other parts when you have removed the tire and wheel from each corner. Now is the time to inspect the brakes and and shocks, checking for any tears or leaks in rubber boots.
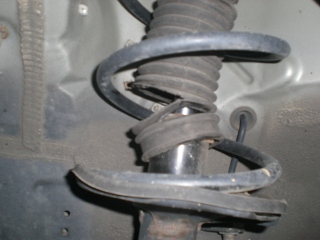
Torn boot on strut

Then install the spare and lower the car. Inspect the tire you just removed for wear, punctures and other damage. If it's good then repeat these steps for each of the remaining tire positions.

When tightening the lugs on each wheel, start them all by hand to avoid crossthreading. Once all are snug fit, use the lug wrench to tighten them until there's no play (but not much tighter) and lower the car.
Finally, use a torque wrench to hand tighten the lugs to specification according to the appropriate pattern for the number of lugs on each wheel (usually 4 or 5). The torque specification can vary widely so check for your specific vehicle but ballpark is typically in the 70 to 80 ft lbs for a regular car.

If you have four jackstands you can do this much faster since you won't need to use the spare tire to temporarily hold each corner of the car up while you swap the tires at another position.

Torque wrench
No comments:
Post a Comment